
How to upload a CAD File for processing into a marketing-ready 3D model
Introduction
If you have engineering CAD files but no marketing-ready 3D model, MarTech3D | Engine can convert them for you. Upload a single file, process an entire product catalogue in bulk, or request a design from a product page — every model is optimised, materials and textures are applied from your brand library, and an expert reviews it before it reaches you for approval. This article walks through the full lifecycle: uploading CAD, tracking the conversion, reviewing the result, and closing it out.
📋 Before You Start
- You need access to Products and 3D Production Queue in MarTech3D | Engine.
- Your CAD files should be in a supported format: STEP, STP, IGES, or IGS. GLB files can also be uploaded directly if you already have marketing-ready models.
- By default you can upload up to 250 files per bulk upload, contact your administrator to increase this limit.
🔄 The Full Flow at a Glance
Here is what happens from the moment you upload a CAD file to the moment you have an approved, marketing-ready 3D model:
- Upload CAD — you upload a single file from a product page, or a folder of files in bulk from the Products list.
- Automatic optimisation — the platform cleans, reduces, and optimises the geometry for web use.
- Materials and textures — your company's brand material library is applied to the model.
- Expert quality check — a 3D specialist reviews the processed model for visual quality and consistency.
- Review and approval — the model appears in your 3D Production Queue as Ready for Review. You approve it, request changes, or add comments.
- Available everywhere — once approved, the model can be used for renders, 360° spins, animations, interactive 3D, AR, and web embeds.
> Note: You do not need CAD or 3D software on your computer. Everything happens in the browser.
✅ Step-by-Step Guide
1. Upload a single CAD file from a product page
If you have a specific product that needs a 3D model, start from that product:
- From Browse Products, open the product and go to its Image Renders tab.
- If the product has no 3D model yet, select Process CAD in the top-right corner.
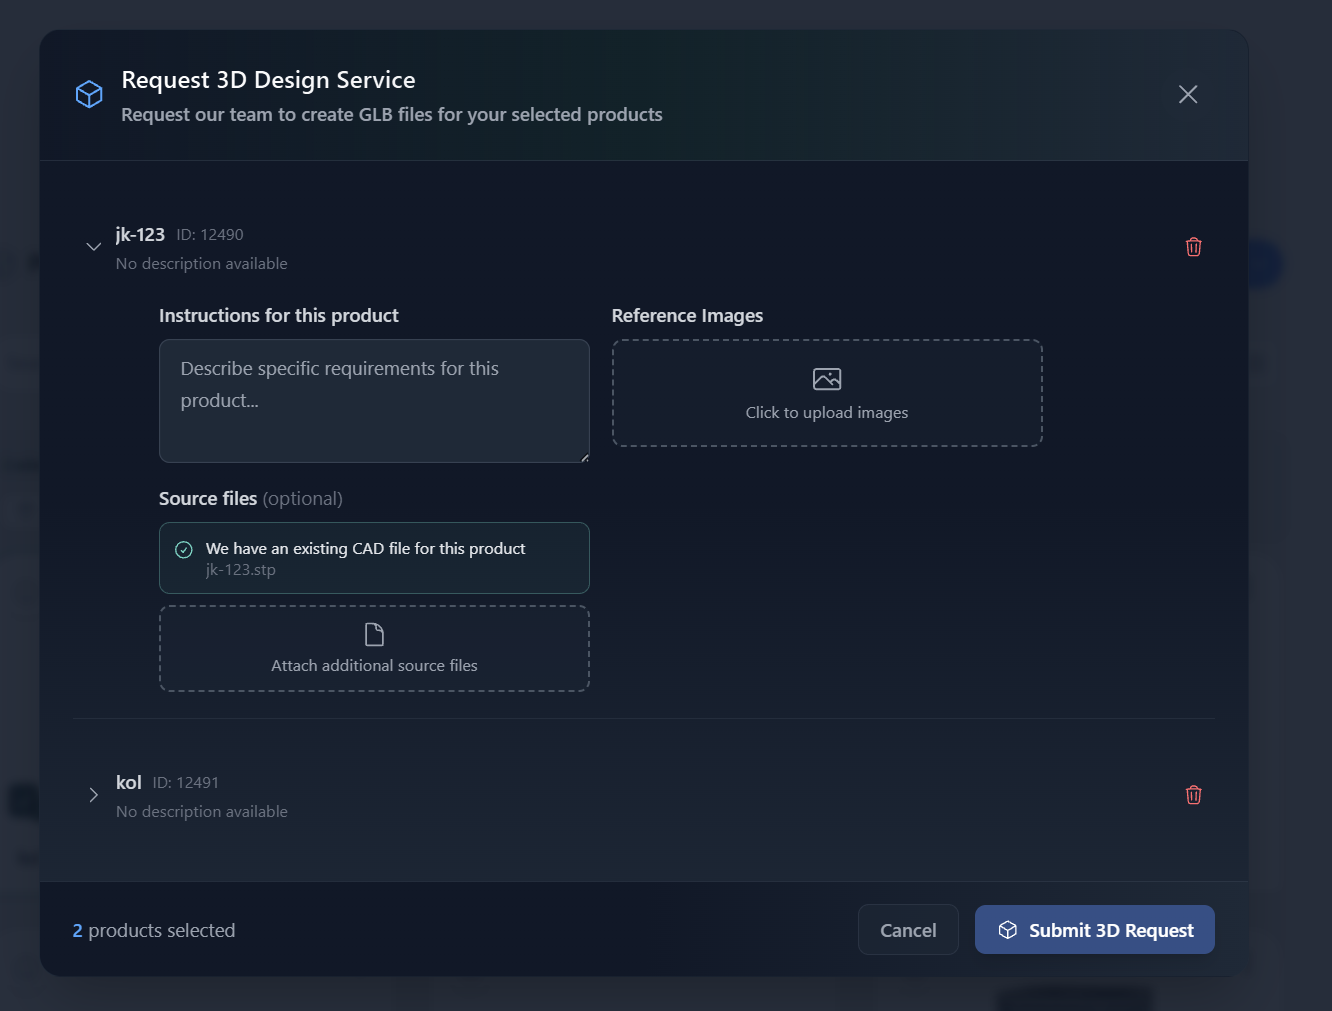
- In the Request 3D Design Service modal, fill in:
- Instructions — describe what you need: orientation, materials, colours, whether it should be optimised for web or AR, and any deadlines.
- Reference images (optional) — upload images showing the look you are after.
- Source files (optional) — upload a CAD file (STEP, STP, IGES, or IGS) if the product does not already have one. If a CAD file is already attached, the designer will use it.
- Needed by (optional) — set a target date if you have a deadline.
- Select Submit 3D Request. You will see a confirmation reading Your CAD is being processed, with a link to Track my requests.
2. Upload CAD files in bulk
If you have many products to process at once, use the Bulk Upload wizard:
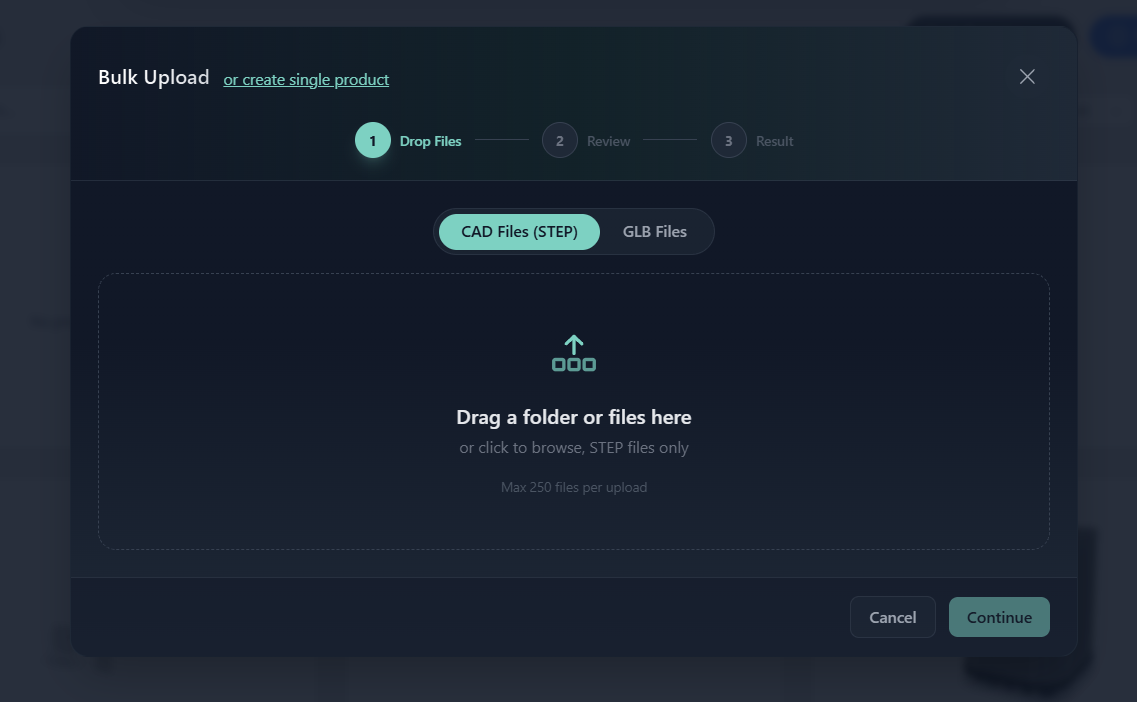
- From Browse Products, select the Add Product dropdown (the chevron next to the Product button) and choose Bulk Upload. You can also access it from CAD → Connections Hub → Bulk Upload.
- In the wizard, choose your file type: CAD Files (STEP) or GLB Files.
- Drag a folder or individual files into the drop zone, or click to browse. You can upload up to 250 files at once. Only STEP/STP files are accepted for CAD; only GLB files for the GLB option.
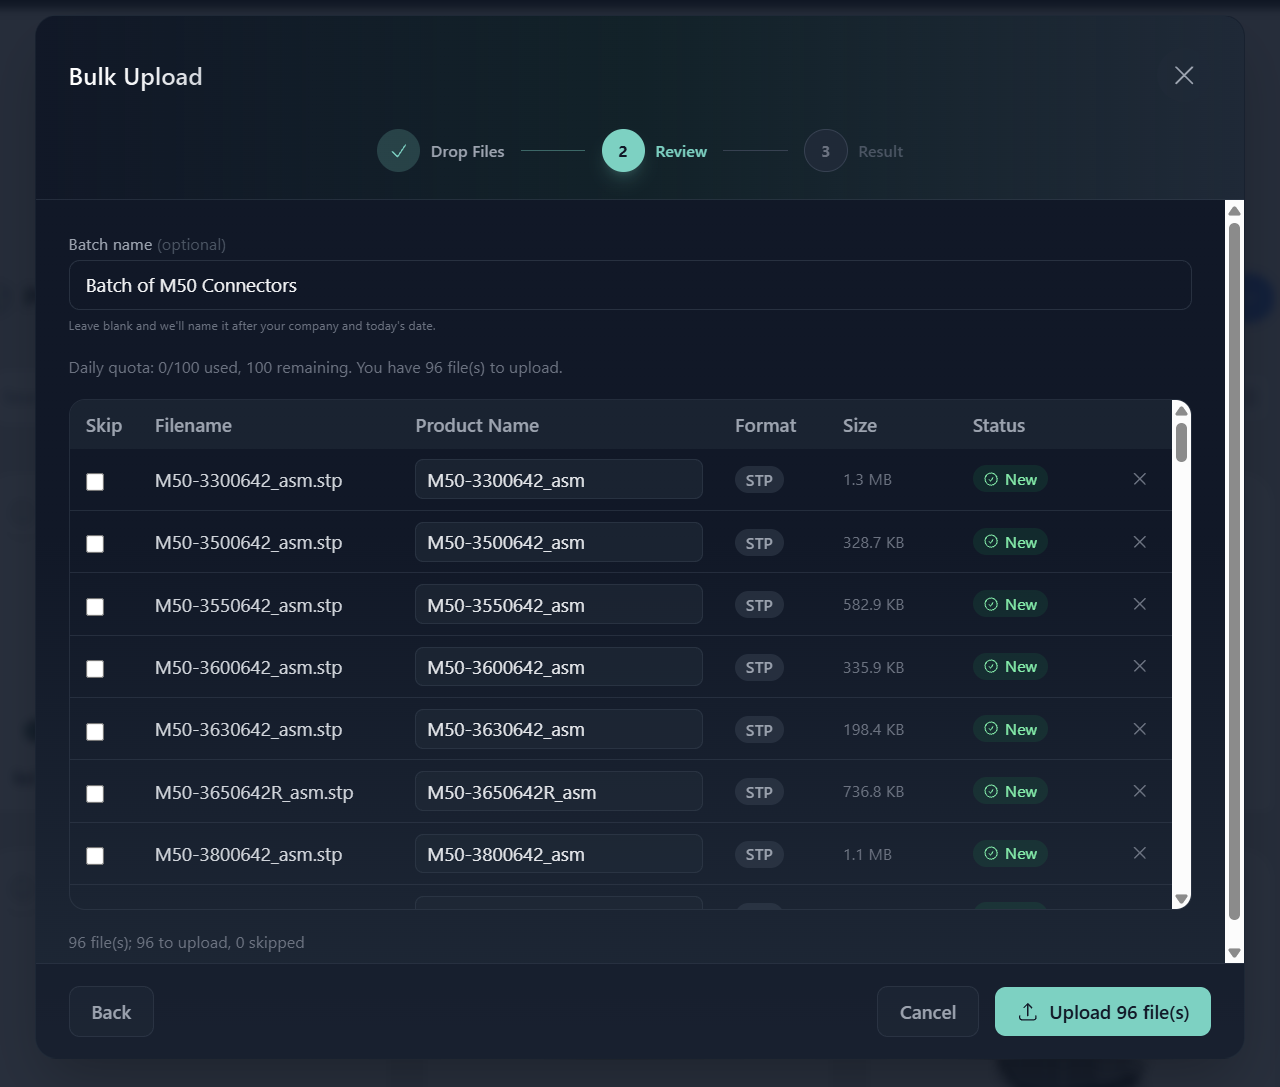
- On the Review step, you will see a table of every file with its auto-derived product name, format, and size. For each file you can:
- Edit the product name — click the name field and type a new one.
- Skip a file — tick the Skip checkbox if you do not want to upload that file.
- Remove a file — select the ✕ button on the right.
- Files already in your library are marked In library — they will be skipped automatically.
- Optionally, enter a Batch name (e.g. "Connectors - August Campaign"). If left blank, the platform names it after your company and today's date.
- Check your daily quota at the top of the table. If your upload exceeds the remaining quota, you will need to reduce the number of files.
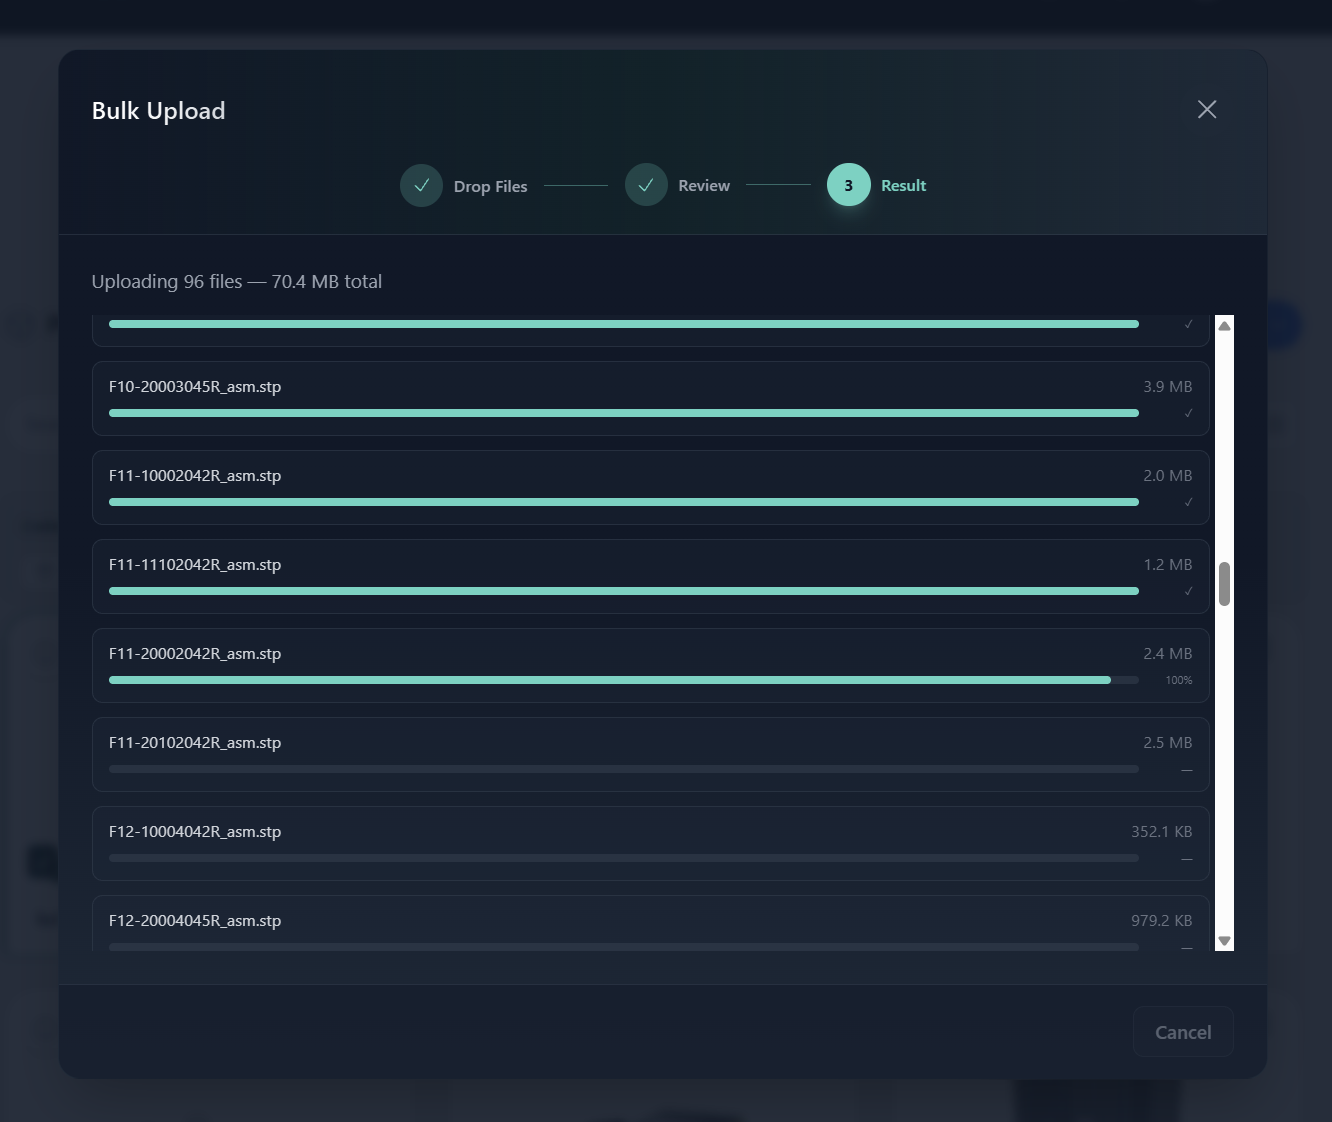
- Select Upload N file(s). Per-file progress bars appear so you can see which files are uploading, completed, or failed.
- When the upload finishes, a summary shows how many products were created, skipped (already in library), or failed. Select Go to Products to see your new products.
> Tip: STEP files uploaded in bulk are auto-converted to GLB drafts and sent to the designer queue automatically. GLB files go straight to your product library and are ready to render.
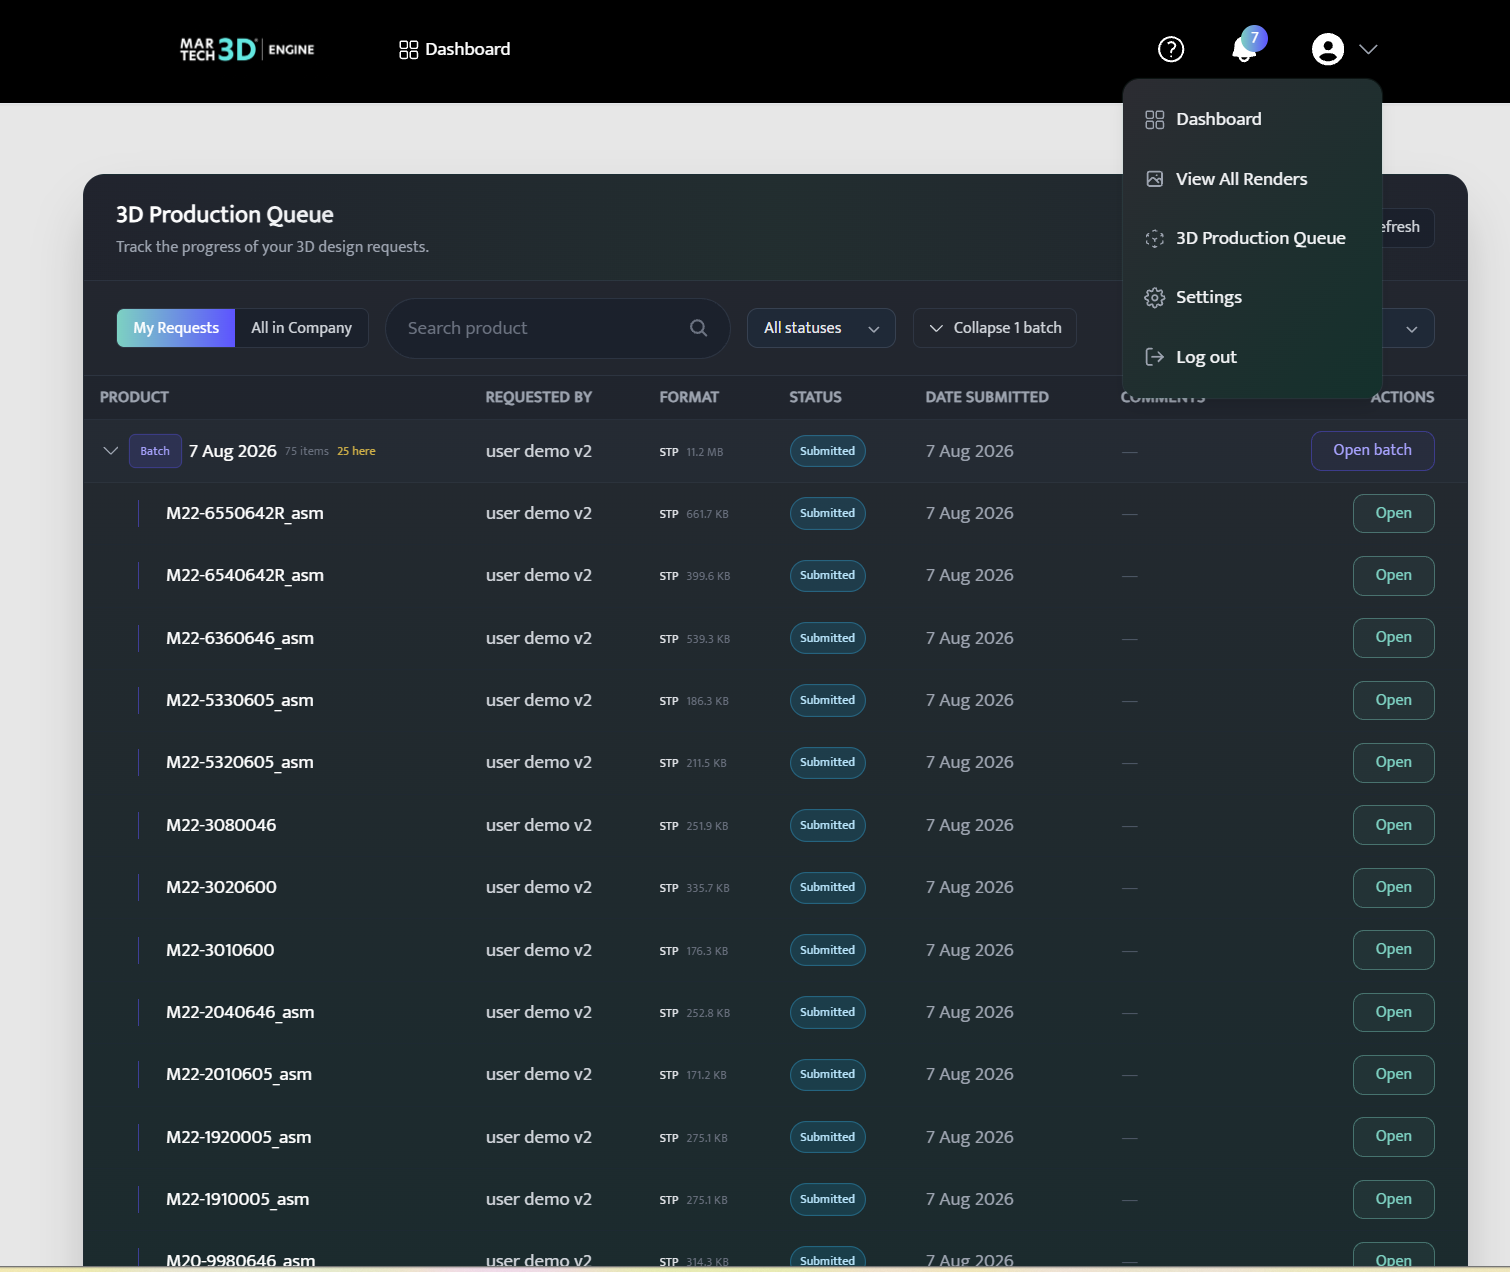
3. Track your request in the 3D Production Queue
Every design request — whether submitted from a single product or in bulk — appears in the 3D Production Queue:
- From the main menu, select 3D Production Queue.
- Use the filter bar to narrow down the list:
- My Requests / All in Company — toggle between your own requests and every request in your company.
- Search product — type a product name. The search runs as you type and keeps your other filters active.
- All statuses — filter by status: Submitted, In Progress, Ready for Review, Revisions Requested, Completed, Cancelled, or Info Required.
- Per page — choose how many requests to show per page.
- Select Open on any request, or select the product name, to open the detail page. Here you can see the full brief, reference images, the latest delivery, and the activity feed.
- Bulk uploads appear as a single row with a Batch badge and an item count. Select the batch name or Open batch to see all items within it.
🎯 Reviewing and Responding to a Delivery
When your designer has finished, the request status changes to Ready for Review and the delivered file appears in the Latest delivery section. Two buttons appear at the top of the detail page:
1. Review the delivered file
The Latest delivery section shows the file type, format, size, who uploaded it, and when. If the designer left notes, they appear beneath the file details.
2. Request revisions (if needed)
If the delivered model is not quite right, select Request Revisions. A modal opens with a text area — describe what should change and be specific so the designer can act quickly. Select Send to submit. The request moves back into the production queue and the status changes to Revisions Requested.
> Tip: Use Request Revisions rather than posting a comment when you want changes — this moves the request back into the queue with a clear revision instruction, so it is not missed.
3. Accept the delivery
When you are happy with the delivered model, select Accept Delivery. The status changes to Completed and the request is closed. You can also accept directly from the production queue list by selecting Accept on a row that is Ready for Review.
⚙️ Commenting on a Request
You can add comments to a design request at any stage. Select Comments in the top-right of the detail page to open the comments panel. Comments appear in the activity feed as Comment posted. Use comments to ask questions, provide references, or give feedback without triggering a revision cycle.
> Note: Internal notes between production staff are never visible to you. Only comments intended for you appear in your feed.
❓ Troubleshooting
- The queue shows "No design requests in this view". You may have a filter active. Try switching to All in Company or setting the status dropdown to All statuses.
- The activity feed shows "Nothing has happened on this request yet". Your request is in the queue but a designer has not started yet. If it has been a long time, contact us via live chat.
- I submitted a request but do not see it. Requests can take a few seconds to appear. Select Refresh in the top-right of the production queue. If it still does not appear, check that you are on the My Requests tab.
- The Process CAD button is not visible. The product may already have a 3D model, or a design request may already be in progress. Look for a View progress link instead.
- Some files were rejected during bulk upload. Only STEP/STP files are accepted for CAD uploads, and only GLB files for GLB uploads. Check the rejected files list shown in the wizard.
- My bulk upload exceeded the daily quota. Reduce the number of files and upload the rest tomorrow, or contact us to discuss increasing your quota.
- I need to change my instructions after submitting. Open the request and add a comment with the updated instructions. The designer will see it.
- My request status is "Info Required". The design team needs more information from you. Open the request, read the comments, and reply with the requested details.
🛠 Need Help?
If you have any questions or run into a problem, contact us via live chat inside MarTech3D | Engine, or email us at support@martech3d.com.